Welcome to the JeepSpecs.com in-depth page on the WK Generation Jeep Grand Cherokee SmartBeam headlamp dimming system. Did we miss anything? Please get in touch with us and tell us about it!
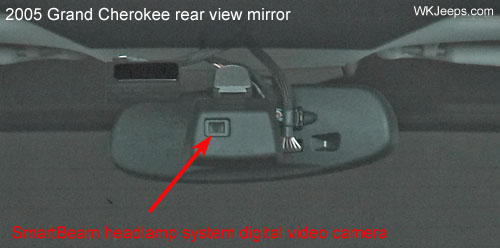
The SmartBeam system provides increased forward lighting at night by automating high beam control through the use of a digital camera mounted on the inside rearview mirror. This camera detects vehicle specific light and automatically switches from high beams to low beams until the approaching vehicle is out of view. The result is an intelligent, high-beam headlamp control system that greatly improves nighttime-driving safety. SmartBeam optimizes the use of a vehicle’s headlamp system in order to provide the maximum amount of light possible for any driving scenario.
To make the transition from low to high beams and back again less distracting and more aesthetically pleasing, SmartBeam is designed to slowly fade the high beams on and off. However, if traffic suddenly appears, such as when cresting a hill or rounding a corner, the system will immediately turn off the high beams.
Low Beams Alone Not Sufficient
SmartBeam is a major breakthrough in nighttime driving safety because it maximizes the use of the vehicle’s high beams. Recent developments in headlamp technology have focused on making low beams brighter. However, because low beams point downward and illuminate the road in front of the vehicle, they’re not as effective as high beams at illuminating obstacles hundreds of feet in advance of the vehicle. High beams point outward, not downward, substantially improving the driver’s ability to detect hazards at a greater distance.
In addition, it’s easy to “out drive” your low beams. Even moderate speeds may be too fast to react to road hazards because your low beams won’t illuminate them far enough in advance. Studies show that at 50 mph, a minimum total lamp intensity of 75,000 candela (cd) is needed to illuminate the driver’s forward view in order to help ensure that the driver can see and react to potential hazards in the road ahead.
Drivers Are Hesitant to Use Their High Beams
Drivers, for a number of reasons, hesitate to use their high beams. In fact, a U.S. Department of Transportation study found that high-beam headlamps are used less than 25% of the time in which driving conditions justify their use.
Why People Don’t Use Their High Beams:
1. They forget
2. They fear forgetting to switch them off when oncoming traffic appears, potentially annoying or temporarily “blinding” other drivers
3. They’re unable to switch them off fast enough
4. Complacency
SmartBeam prevents these problems and ensures optimal use of a vehicle’s high beams. The system maximizes forward vision by automatically turning on the vehicle’s high beams when no other vehicle traffic is present, and reverting them back to their low-beam intensity when detecting either the headlamps of oncoming traffic or the taillamps of preceding vehicles.
Problems with Previous Systems
For years, the automotive industry has searched for lighting solutions that maximize forward vision without producing oncoming glare. Previous “automatic” high-beam controls systems abruptly changed from high to low beams and did not work well due to nuisance switching from non-vehicle light sources. They were also unable to effectively see preceding vehicle taillamps, and could not distinguish many types of light sources within an adequate time period.
SmartBeam solves the issues with previous systems and has performed well in demonstration test drives.
Operation:
To Activate (2005-2009 models):
1. Select “Auto Headlamp Low/High Beams? — Low/ High Beam.” in the Customer Programmable Features mode of the EVIC.
2. Turn the end of the multi-function control lever to the A (Auto) headlight position.
NOTE: This system will not activate until the vehicle is at or above 17 mph (27 km/h).
To Deactivate (2005-2007 models):
1. Pull back on the muti-function control lever to manually deactivate the system (normal operation of high beams).
2. Pull back on the multi-function control lever once again to re-activate the system.
To Deactivate (2008-2009 models):
1. Pull back on the muti-function control lever to manually deactivate the system (normal operation of low beams).
2. Push back on the multi-function control lever once again to re-activate the system.
NOTE: Broken, muddy, or obstructed headlights and taillights of vehicles in the field of view will cause headlights to remain on longer (closer to the vehicle). Also, dirt, film, and other obstructions (sticker, toll box, etc.) on the windshield or camera lens will cause the system to function improperly.
When the SmartBeam system is enabled, it is dark enough to justify use of high beams, the vehicle is moving over 20 mph, and no other traffic is present, the high beams will gradually turn on. When the system detects an approaching vehicle’s headlamps or a preceding vehicle’s tail lamps, the high-beams will turn off.
Depending on the driving scenario, SmartBeam may fade the high-beams on and off, or control them off instantly. The high-beam indicator on the instrument panel will illuminate as soon as the high-beams start to come on, and will remain on until the high-beams have faded off completely. All SmartBeam-equipped vehicles, however, will quickly turn off the high-beams if the system detects the sudden presence of vehicle lights ahead. SmartBeam does not prevent the driver from using the high-beams manually. Flash-to-pass is still functional with SmartBeam.
The lighting control switch, located on the left stalk, must be in the Auto position labeled “A” on the stalk. The system can return to manual control by pulling the stalk towards rearward. A partial pull will momentarily power the high beams (flash-to-pass). A complete pull will override SmartBeam. A message will temporarily appear in the reconfigurable display to confirm. Also, the high beams will change from on to off, or off to on, with a complete pull. SmartBeam will only activate the high-beams when traveling at speeds in excess of 17 mph (27 km/h). If the high-beams are on while decelerating and approaching a full stop, the system will turn them off at approximately 15 mph.
SmartBeam senses lighting conditions directly ahead of the vehicle. In certain situations, such as hills or winding roads, it may be more comfortable manually overriding the system because the vehicles in front may not be in SmartBeam’s field of view. However, it is not likely to be causing discomforting glare to other drivers.
SmartBeam’s light sensor is located on the inside of the vehicle in front of the interior rearview mirror. Because it looks through the windshield, the system may not function properly if this area is covered with ice, dirt, haze or any other obstruction. SmartBeam may not function properly if its field of view is obscured. The SmartBeam is not serviceable separately from the inside rear view mirror. If the light sensor is damaged or faulty, the entire inside rear view mirror must be replaced.
For optimal system performance, The light-sensor window must be cleaned periodically, as it may haze over due to the air quality in the vehicle passenger compartment. Spray a small amount of glass cleaner onto a soft cloth and gently clean the sensor window. Do not spray the glass cleaner directly on the sensor window.
For optimal system performance, the Smartbeam camera should be re-aimed by the dealer to insure that the camera is properly centered on the road ahead. If the camera is not aimed relative to the new vehicle environment (replaced windshield or button) the system performance may be diminished or altered.
SmartBeam uses a green Light Emitting Diode (LED) unit to indicate certain faults it detects in the imager camera and circuitry. A slow (once-per-second) continual flashing of this LED indicates the SmartBeam camera requires aiming. A fast (twice-per-second) continual flashing of this LED indicates that a SmartBeam fault has been detected and a Diagnostic Trouble Code (DTC) has been stored. The LED is located to the right of the power button on ElectroChromic (EC) inside rear view mirrors without the hands-free communication option, or to the left of the AUTO button on EC mirrors with the hands-free communication option.
The SmartBeam circuitry within the EC mirror will store a DTC for any fault that is detected. The hard wired inputs and outputs of the EC mirror may be diagnosed using conventional diagnostic tools and procedures. However, conventional diagnostic methods will not prove conclusive in the diagnosis of the SmartBeam unit, the EC mirror or the electronic controls or communication between modules and other devices that provide some features of the automatic highbeam system. The most reliable, efficient, and accurate means to diagnose the SmartBeam, the EC mirror or the electronic controls and communication related to automatic highbeam system operation requires the use of a diagnostic scan tool.
SmartBeam calibration (requires scan tool)
SmartBeam calibration must be performed after the inside rear view mirror is replaced with a new unit, and may also be required following any rear view mirror mounting button or windshield replacement procedure. The calibration procedure ensures that the field of vision for the SmartBeam imager is aimed at the proper path directly ahead of the vehicle. New and unused replacement SmartBeam units are shipped in calibration mode, which will be indicated by a slow (once-per-second) continuously flashing electrochromic mirror Light Emitting Diode (LED) while the ignition switch is in the ON position. Complaints of poor or improper system performance following mirror mounting button or windshield replacement indicate the need for SmartBeam calibration
Vehicle preparation for SmartBeam calibration
1. Be certain that the imager lens and the windshield glass in front of the imager lens are clean and free from obstructions.
2. Be certain that the inside rear view mirror mounting set screw is tightened to 1.7 N·m (15 in. lbs.).
3. Repair or replace any ineffective, worn or damaged suspension components that could hinder proper SmartBeam calibration.
4. Verify proper tire inflation pressures.
5. Remove any accumulations of mud, snow or ice from the vehicle underbody.
6. Verify that there is no load in the vehicle (cargo or passengers), except for the driver.
7. The fuel tank should be FULL. Add 2.94 kilograms (6.5 pounds) of weight over the fuel tank for each estimated gallon of missing fuel.
8. Verify correct vehicle suspension height.
9. Verify that the vehicle has at least 16 kilometers (10 miles) showing on the odometer.
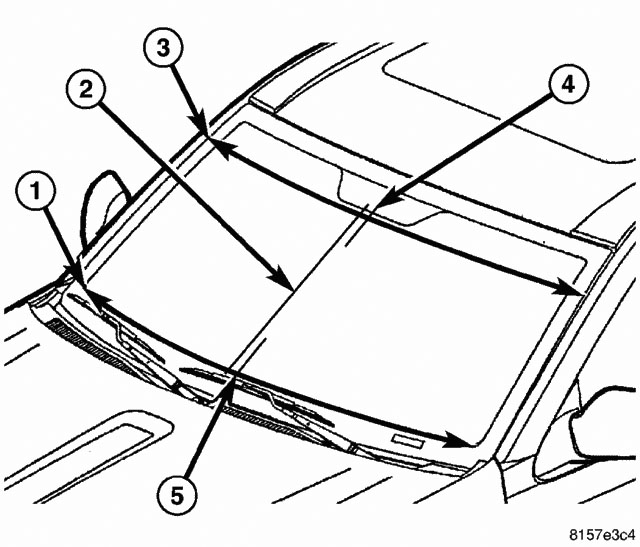
Mark imager centerline on windshield
1. Take a measurement (3) across the lower edge of the tint band at the top of the windshield using the shaft of the tint band arrow within the AS1 marking on each side of the glass as the reference points.
2. Divide the upper measurement in half and mark that dimension near the lower edge of the tint band on the glass (4) using a grease pencil. This is the upper centerline of the glass.
3. Take a measurement (1) across the upper edge of the blackout area at the base of the windshield using the inside corner where each side blackout area intersects the lower blackout area as the reference points.
4. Divide the lower measurement in half and mark that dimension near the upper edge of the lower blackout area on the glass (5) using a grease pencil. This is the lower centerline of the glass.
5. Measure and mark 21 millimeters (0.827 inches) toward the passenger side of the windshield from the upper and lower glass centerline marks and draw a line (2) between these marks. This is the centerline of the imager.
NOTE: Be certain to clean the centerline marks from the area of the glass in front of the imager lens before attempting to calibrate the SmartBeam unit.
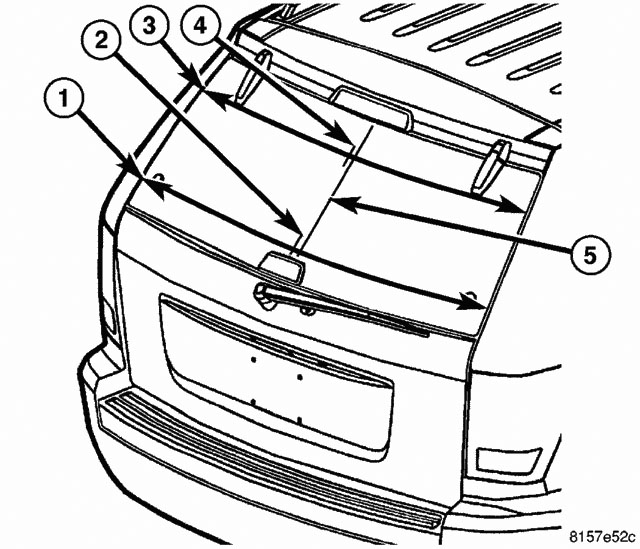
Mark imager centerline on liftgate glass
1. Take a measurement (3) across the lower edge of the liftgate glass hinges using the vertical edges of the body liftgate opening as the reference points.
2. Divide the upper measurement in half and mark that dimension on the glass (4) using a grease pencil. This is the upper centerline of the glass.
3. Take a measurement (1) across the lower edge of the liftgate glass strut mounts using the vertical edges of the body liftgate opening as the reference points.
4. Divide the lower measurement in half and mark that dimension on the glass (2) using a grease pencil. This is the lower centerline of the glass.
5. Measure and mark 21 millimeters (0.827 inches) toward the passenger side of the liftgate glass from the upper and lower glass centerline marks and draw a line (5) between these marks. This is the centerline of the imager.
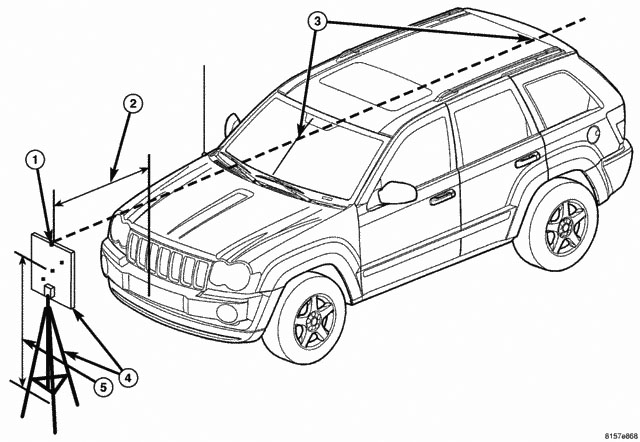
Set up aim board and tripod
Position the vehicle on a level surface in a dimly lit area.
Place the aim board and tripod (4) (Special Tool No. 9649) 127 centimeters (50 inches) ahead of the foremost center of the front fascia (2).
Sight through the V-notch (1) in the upper edge of the aim board to align and center the board to the imager centerline marks on both the windshield and the liftgate glass (3).
Adjust the tripod so that the center Light Emitting Diode (LED) on the aim board is 145 centimeters (57 inches) from the level floor (5).
Calibration procedure
1. Connect a diagnostic scan tool to the Data Link Connector (DLC) below the driver side end of the instrument panel.
2. Turn the ignition switch to the ON position.
3. Use the diagnostic scan tool to enter the SmartBeam unit into calibration mode. Look in the diagnostic scan tool under the SmartBeam or AUTOMATIC HIGH BEAM MODULE/AHBM menu item as appropriate. When the SmartBeam unit has entered calibration mode, it will be indicated by a continually flashing of the electrochromic LED at a slow rate of once-per-second.
4. Connect the aim board transformer to illuminate the aim board LED units. The electrochromic LED will continue to flash for five to ten seconds, then will stop flashing to indicate that it has completed calibration. If the LED begins to flash at a faster rate (twice-per-second), it indicates that a Diagnostic Trouble Code (DTC) has been recorded. Use the diagnostic scan tool to retrieve the DTC, then refer to the appropriate diagnostic information.
SmartBeam activation:
1. Select “Enable Auto HI Beams” from the Vehicle Information Center menu.
2. Turn the end of the multi-function control lever to the “A” (Auto) headlight position.
NOTE: This system will not activate until the vehicle is at or above 20 mph (32 km/h).
To deactivate:
1. Pull back on the muti-function control lever to manually deactivate the system (normal operation of high beams).
2. Pull back on the multi-function control lever once again to re-activate the system.
NOTE: Broken, muddy, or obstructed headlights and taillights of vehicles in the field of view will cause headlights to remain on longer (closer to the vehicle). Also, dirt, film, and other obstructions on the windshield or camera lens will cause the system to function improperly.
SmartBeam demonstration mode:
The SmartBeam automatic high beam system has a demonstration mode. This mode allows the function of the automatic high beams accompanied with that of the high beam indicator in the instrument cluster to be demonstrated while the vehicle is stationary and under any ambient lighting conditions. Besides demonstrating the automatic high beam system, this mode will confirm that the system electronics and circuitry are functional. This mode also incorporates a feature that allows a functional test of the imager optics to be performed.
NOTE: The SmartBeam Demonstration Mode will NOT be functional when a diagnostic scan tool is connected to the 16-way Data Link Connector (DLC) beneath the instrument panel on the driver side. Once the demonstration sequence has begun, a detected vehicle speed input of over 8 kilometers-per-hour (5 miles-per-hour) will cause the sequence to be aborted and the automatic high beam system to return to normal operation.
1. With the ignition switch in the OFF position, depress and hold depressed the power ON/OFF button (w/o hands-free communication option) or the AUTO button (w/hands-free communication option) on the electrochromic inside rear view mirror.
2. With the button still depressed, start the engine by turning the ignition switch to the START position.
3. Continue to hold the button depressed until the Demonstration Mode begins (headlamp high beams and high beam indicator illuminate), at which time the button may be released.
4. The automatic high beam system will complete three cycles of ramping up the headlamp high beams to full brightness, then ramping them down until fully extinguished accompanied by the appropriate indications from the high beam indicator. At the conclusion of this sequence (about 40 seconds), the automatic high beam system will return to normal operation.
Adding the SmartBeam system to Laredo models:
2005-up Grand Cherokee Laredo owners that want to add the factory SmartBeam feature can easily do this, although it will be expensive unless the parts can be found used or discounted. The factory list price for the mirror is $359.00. All that is required is to change out the standard rearview mirror with the “SmartBeam” mirror that comes on Limited models. Note: you must use the non-UConnect version of the SmartBeam mirror (part number below) unless your vehicle originally came with the factory UConnect option.
To install the new mirror, disconnect the negative battery terminal. The mirror is attached with a set screw that needs to be loosened, it will then slide off of the windshield mounting bracket. Install new mirror, tighten the setscrew and reconnect battery cable. The wiring harness for the standard rearview mirror plugs right in to the SmartBeam rearview mirror. For optimal system performance, the Smartbeam camera should be re-aimed by the dealer to insure that the camera is properly centered on the road ahead.
SmartBeam rearview mirror (without UConnect) – P/N 55157395AD. MSRP $364.00.
SmartBeam rearview mirror (with UConnect) – P/N 55156726AH. MSRP $564.00
(for upgrading vehicles that came from the factory with the non-SmartBeam UConnect mirror)